BUILDING, PERFORMING & EDUCATING WITH MUSICAL INSTRUMENTS MADE FROM TRASH SINCE 1991
MUSICAL INSTRUMENTS > STRINGS > STRYOCELLO
The styrocello is a very versatile instrument for all its simplicity. To really make this instrument sing you will need a bow - either a “real” bow, or a trash bow.
The one thing that our styrocello lacks is a fingerboard to press the strings against. Bash the Trash players solve this by using the fingers alone (without a fingerboard) to stop the strings, rather than trying to press the string all the way to the cardboard tube.
YOU WILL NEED:
-
Fingerboard: A long, strong cardboard tube - at least 3 feet long for a mini-styrocello, or as long as 5 feet for a full-size styrocello. We’ve found that the best diameter cardboard tube is about 2.5 inches, with the width of the cardboard itself at least 1/4" thick. You can find tubes like this at a local rug store or a fabric store - they are usually quite happy to give them away.
-
Sound Box: A styrofoam box or block. The bigger your styrofoam, the louder your styrocello will sound.
-
Bridge: A small wooden block - approximately 3" x 3" x 1"
-
Strings: Fishing line - the thicker, the better. The best is 60-80 lb test line of the kind used for larger fish. The thinner the fishing line, the softer your styrocello will sound.


MUSICAL INSTRUMENT BUILDING - THE PROCEDURE!


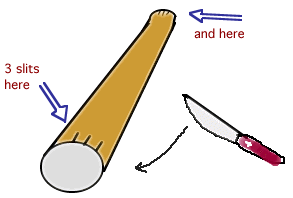
1. Get an adult to help you cut two small slits on one end of the tube and two more on the other end. Big scissors will work well, or a non-serrated knife.
2. Cut a length of fishing line to be quite a bit longer than your tube. Tie a knot in one end of the fishing line. Double it to increase the size of the knot.
Slide the doubled knot into the slit at the end of the tube with the knot inside the tube. This will anchor one end of the string.
(If you are planning to use turnbuckles see alternate version below)
3. Lay the tube on the floor with the styrofoam on top in the middle of the tube [open side down if you have a box]. Then pull the anchored string over the styrofoam to the other end of the tube so that it is semi-tight. Here is where you will tie the second knot and anchor it in the other end of the tube. A more advanced version might involve ASKING A ADULT to help cut holes in the styrofoam so that the tube can slide through the box rather than sit on top of it.
Repeat the process with the second string. Try to make it slightly tighter or looser than the other string.
4. Slide the wooden block between the styrofoam and the strings. Then slide the whole styrofoam and bridge assembly down the tube until the strings are nice and tight.
Slide the wooden block between the styrofoam and the strings. Then slide the whole styrofoam and bridge assembly down the tube until the strings are nice and tight.
TO MAKE THE TUNEABLE VERSION USING TURNBUCKLES DO STEPS 1 AND 2 ABOVE.
Turnbuckles can tune your strings by tightening and loosening the strings. You can buy a small turnbuckle in hardware stores for about a dollar. Turnbuckles have two eye hooks connected to a center piece. Turn the center piece and the eye hooks move toward each other. This tightens the strings and allows you to tune much more accurately.
5. Using a screw and screwdriver, attach the turnbuckle to the bottom of your tube. Tie the string to the top eye hook. Then continue with step 4 above. Now you can use the turnbuckle to make fine tuning adjustments.
A Note on Bridges - Bridge design is something that we are actively experimenting with. We’ve tried rectangular blocks as well as various kinds of arch shapes.
Skip La Plante, our Bash the Trash styrocellist (and builder of the model shown) likes the bridge pictured, with a long base that he feels transfers more vibrations to the styrofoam.
Whatever you use, make sure that the bridge is big enough on the bottom to not plunge straight through the styrofoam.
TO PLAY
Place the box end of the styrocello on the floor (or grip it between your knees if the tube doesn’t reach the floor) and lean the instrument back against your shoulder as you sit in a chair. Pluck the strings just above the bridge. To change pitch you can place your fingers against the strings near your shoulder to create a pizz effect; or slide a pencil up and down the strings as you pluck to get a gliss sound.
USE A BOW:
You may want to use a violin or cello bow on your styrocello. A bass bow should get an even bigger sound. To make your own bow click here.


