MUSICAL INSTRUMENTS > STRINGS > TUBE GUITAR
The tube guitar (or as we at Bash the Trash call it - the Tubetar) is a step up from rubber band instruments.

MUSICAL INSTRUMENT BUILDING - THE PROCEDURE!
YOU WILL NEED

-
A Tube: A good sturdy cardboard tube, not like a paper towel tube, but one with thick walls, like a mailing tube or a rug tube. The best tubes can be gotten either at a rug store or a fabric store. They should be happy to give them to you, after all, it costs them money to have them hauled away! My local rug store is used to me visiting them once in a while to take some of the cardboard bounty...
-
The ideal tube dimensions should be around 30" long, 3" diameter and with walls 1/8" thick. But in reality you can fool around with anything that is study enough to withstand the tension of the strings.
-
A Small Block of Wood: The ideal piece would be 2" tall, 2" wide and 1" deep, but anything that will fit inside the bottom of the tuna can will work.
-
Fishing Line: The best is 60 or 80 pound test, which I guess is used for catching, like, sharks, or volkswagons (I know nothing about fishing). Smaller gauge fishing line is ok, but will have a softer sound (becauseA tune there's less stuff vibrating).
-
A Tuna Fish Can: Catfood cans should work just as well. Remove the top, and then please wash them......
1.
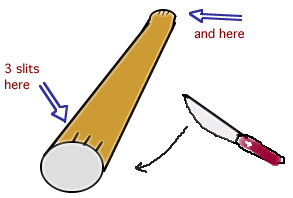
Using a sharp, non-serrated knife, cut 3 small slits at one end of the tube. They should be about 1/2 apart and about 1/2 inch long. Cut three more slits on the other end of the tube.
2.

A) Cut three lengths of fishing line, each around 6-12" longer than the tube.
B) Tie a knot in the end of one of the fishing line strings; double it if necessary. The whole point is to have a big enough knot so that it can be anchored in the slit (see below).
3.

Anchor the string inside the tube by slipping the string into the slit with knot inside the
4.

Repeat the process at the other end of the tube, making sure that the string has the correct tension.
Repeat the process for the other two strings: tie the knot, slip it in the slot, tie the other end. At this point you should consider making some strings slightly tighter than others, so that each string will give a different pitch.
5.
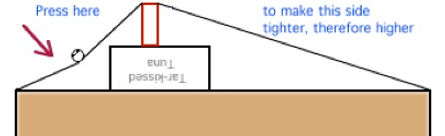
Once you have finished with the strings slide the can under the strings with the open end facing the tube. You will probably notice that the strings are not quite tight enough to make good sounds. So, slip the wood block under the strings on top of the can and then rotate the wood upright so that it makes a kind of bridge.
NOTE: You may have to adjust the tension of the strings to get just the right notes. The way to do this is to make a series of small knots on the strings and experiment as to just which knot gives the string just the right tension.

TO PLAY!
You can pluck the strings with your fingers or strum it with some kind of pick sort of thing (a penny is acceptable, although stiff plastic is better). You can also change the tension of the strings (tighter = higher and looser = lower) by playing like a brazilian berimbao or a japanese koto. Play the longer set of strings while pushing on the strings on the other side of the bridge. The more you push, the higher the pitch.